Whether you’re looking for easy DIY ideas or long-term kitchen remodel projects for holiday baking, this blog post has you covered.
 This holiday season is sure to look very different from years past, as families continue to practice social distancing and limiting indoor events that could promote the spread of COVID-19.
With this in mind, instead of inviting family in for a holiday meal, use our current circumstances as a chance to send treats out! It’s never been a more perfect time to share your favorite cookie or treat with those closest to you and let them know you care.
If you are a first-time holiday baker, it may seem overwhelming to prep your kitchen for a large quantity of baked goods. However, there are some easy ways to make your space more functional. If you’re a holiday baking pro, on the other hand, perhaps you’re thinking about that kitchen remodel you’ve always wanted to transform your space into the perfect at-home bakery.
Either way, in this blog post we share some ideas to turn your kitchen into the perfect place to create delicious treats that will spread lots of holiday cheer!
Short-term DIY Tips
If you’re looking for a quick fix to make holiday baking easier, there are a few things you can do to turn your kitchen into the ideal space for turning out baked goods.
- Use a rolling kitchen cart to create temporary storage that can house all of your baking supplies. By adding a kitchen cart, you don’t need to rearrange your entire kitchen, and you can stow it away in a closet or pantry when it’s not in use. (Bonus tip: find a kitchen cart with a solid surface top that you can double as additional work space).
- Create a workspace. If you don’t normally keep a large section of your countertop cleared and ready for mixing, rolling, etc., clear the clutter and set a dedicated space that you can use throughout the baking season.
- Use glass containers or mason jars to store smaller supplies (i.e. cupcake liners, cookie cutters, etc.), so you can see the contents of each at first glance. Consider keeping the most used items out on your workspace, and put the rest on your cart or in a cabinet/pantry where there’s extra space.
- Group the ingredients needed for each baking project into their own storage space (i.e. a basket, bin, etc). This will help streamline the baking process and save time.
- Tuck away infrequently used items. As you’re reorganizing, you’ll likely come across kitchen items that you don’t often use. Don’t let them take up prime real estate for nothing! Tuck these items away for potential future use, or even consider selling or donating them. This will free up more space for baking and other items you use more frequently.
Longer-term Kitchen Remodel Ideas
If you’re an experienced baker, perhaps you’re looking for a more permanent solution for holiday baking that will benefit you for years to come.
Create your ideal workflow
The flow of your kitchen is as unique as you are! While designers recommend creating a triangle with your sink, fridge, and stove, the rest of your kitchen layout should reflect how you will best use the space. Take counter space, for example. There may be a need for ample prep space to fit a stand mixer, roll out dough, etc., so make sure to keep things like this in mind when you’re laying out your kitchen remodel.
Get organized
No matter the size of the space or scale of your kitchen remodel, it’s important to optimize the space you have to store all of your baking supplies and equipment.
- Dedicate an entire cabinet or large drawer (or both!) for your baking supplies so everything is one place. Ideally the location of the cabinet or drawer would be near where you plan to do most of your mixing, rolling, etc.

- Build a tall narrow cabinet for storing baking trays/sheets upright.
- Install a spice cabinet. Use it to store your sprinkles and decorative items.
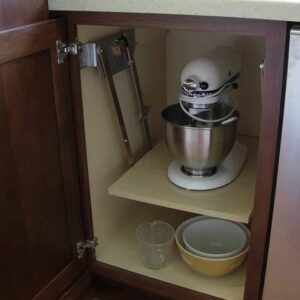
- Build a cabinet for your heavy stand mixer, so it’s easily accessible. You might even consider putting a lift in the cabinet to make it even simpler to access.
- Consider an area – whether it’s a shelf, cabinet, or something else – to store all of your cookbooks and written recipes. Ideally this would be close to your work station.
- For countertops, choose a solid surface finish that is ideal for rolling out dough (granite, marble).
- Ever try to wash your hands after they’ve been handling sticky dough? By adding a touchless, motion-activated faucet, you don’t have to worry about getting your sink handles dirty.
- Be sure you install ample, bright lighting, so you’re able to clearly see the treats you’re decorating.
- It’s critical that you have access to power in the right places, so you’re able to plug in a stand/hand mixer and other items. Not a fan of how outlets look? Add pretty outlet covers or consider hiding power access by putting an outlet in a cabinet or other covered areas.
It doesn’t matter if this is your first year or 10th year holiday baking – there are both small, simple add-ons, and larger, more permanent kitchen remodel upgrades to make your space work best for your baking needs. And even though this year may look different, you can (and should!) still enjoy your space and baking for loved ones.
If you’re ready for a remodel or have a project in mind that you’d like to discuss, we’d love to hear from you!


